Here is my trial using dwm1001-dev with arduino through UART communication.
I recommend to get an arduino mega instead of arduino uno since mega comes with more uart. It would be helpful when debugging since at least one uart is needed to communicate with your computer.
I connect my dwm1001-dev rx and tx to my arduino mega rx1 and tx1. Leave rx0 and tx0 alone since they are needed in my serial monitor of Arduino IDE.
And if you want use it with dwm1001, it is recommended to make sure the voltage is 3.3V between dwm1001 and arduino, especially for dwm1001 rx. I have broken one of my dwm1001 because of it.
Say I want to read the tag position.
I set one of my dwm1001 as the listener (passive anchor) and connect it to my arduino through uart.
According to the DWM1001 firmware API guide, I have to get into Shell Mode and send lec command to my dwm1001 listener.
So, now it is the code part of my arduino.
String c; //some temporary string variable
void setup() {
  Serial.begin(115200); //it could be different according to your arduino serial baud setup
  Serial1.begin(115200); //dwm1001 require 115200 baud
  Serial1.write(0x0D); //send the first "Enter"
  Serial1.write(0x0D); //send the second "Enter" to get into Shell Mode
  c = Serial1.readString(); //read the response from dwm1001
  Serial1.write(0x6C); //send "l"
  Serial1.write(0x65); //send "e"
  Serial1.write(0x63); //send "c"
  Serial1.write(0x0D); //send "Enter"
}

void loop() {
  Serial.println(Serial1.readStringUntil('\n')); //show position in Serial Monitor
}
That is it. Should be quite simple.
I used Serial1.write command instead of Serial1.print because somehow it is more stable in my trial.
As for those of you who want to use SPI communication with Arduino, please refer to this post.
https://forum.qorvo.com/t/spi-communication-with-arduino/2652/2
It has worked on my test of SPI communication.
2 Likes
This is really helpful.
How did you find which pins are the rx/tx pins on the dwm1001? I’ve been looking all over to see which pins are for UART and which to use for SPI but I can’t find a reliable pinout and they’re not marked on the module itself. I’m good with soldering and there’s a ton of info on everything else but I’m not sure which pins to solder to to connect to my arduino or teensy.
But thanks for the code here, this will really help.
-Odinn Dagur
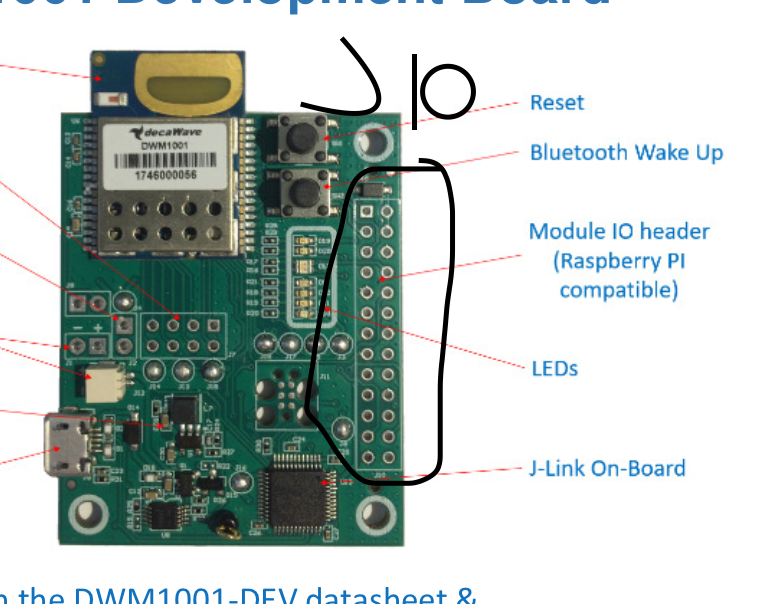
Thanks so much!! I feel like a dweeb - I had honestly looked around but didn’t notice the J10 on the pcb or the RPI Header text in the schematic… heh.
Thanks, I really appreciate it.
Hi there
I am using DWM1001 dev with and Arduino Due. I ave been able to get information from the boards using the USB cable and using putty on my laptop, however, when I connect it to the Arduino I get nothing. I think that it is not receiving the command to go into shell mode which means that it won’t get any other commands. Any ideas?
Cheers, Macgregor
Hi,
i’m not into Arduino but think an easy step is to keep the usb cable connected and use Rx pin 8 and Tx pin 10 from the connector J10 as UART connection to your arduino.
Now you can put the DWM in shell mode in your terminal by pressing enter twice and check what your Arduino does with the serial data.
I hope this is a bit helpfull
Hi,
Thanks for that, I tried doing this but the Arduino seems to override the USB connection which means I can see what is being sent from the Arduino is sending in the terminal but I am not able to send commands. If I disconnect TX/RX and put the DWM1001 into shell mode before connecting the Arduino I am able to see the Arduino sending the command but nothing is printed onto the serial monitor, I’m thinking there might be an issue reading the data through the Arduino.
Hi,
Since my last post I have been able to get UART to work with Arduino. My problem was that the board had no firmware on it (simple fix I know!).
I have run various different bits of code on it but have settled for this one as it is very simple.
void setup() {
// put your setup code here, to run once:
Serial.begin(115200);
Serial1.begin(115200);
Serial1.write(’\r’);
Serial1.write(’\r’);
delay(100);
while (Serial1.available()) {
Serial.println(Serial1.readStringUntil(’\r’));
delay(1000);
Serial1.write("si");
Serial1.write('\r');
delay(100);
if (Serial1.available()) {
  Serial.println(Serial1.readStringUntil('\r'));

}
}
}
void loop() {
// put your main code here, to run repeatedly:
}
This code work wonderfully most of the time.
I am now experiencing a new problem where the board will sometimes not enter shell mode. No matter how many times I power it on/off, reset it using the reset button and pulling the reset pin LOW, it will not enter shell mode and will only send back an @ and 2 squares (@ SOH SOH).
This is the expected response when trying to send commands without being in shell mode. However I did randomly (only ever received it once) got some interesting information in the middle (has anyone seen this before?)
Then, one day it will work perfectly before going back into its little hole of refusing to switch into shell mode.
The annoying thing is that when I plug it into USB and send a double \r through Putty, it will work (sometimes after a few tries). Does anyone have any ideas about why this might be happening. All documentation and previous posts suggest that the switch between API mode and shell mode should be as easy as it sometimes is, but too often it will go into hibernation.
Many thanks for any help,
Macgregor