Last Updated: February 13, 2025
Prerequisites
For this tutorial, you will need the following:
- DW3_QM33_SDK_1.0.2
- 1 board from QM33120WDK1 (this kit comes with 2 boards)
- Spectrum Analyzer
- SMA to SMA cable rated for frequency of interest (6.4896 GHz for Ch5 and 7.9872 GHz for Ch9)
Note: the SDK also supports the following boards but these boards have on-board antennas so unless you have an advanced setup capable of over-the-air (OTA) measurements, they are not recommended.
Background
You must perform TX power calibration in order to successfully certify your product with the regulatory body (e.g., FCC, CE, etc.) at an official compliance laboratory. Before partaking in this process, you may wish to check the conducted TX power of your design in your own lab and make adjustments.
Example Setup
For the purposes of this tutorial, we are using the following hardware:
- Single antenna board from QM33120WDK1 with antenna removed
- R&S FSP Spectrum Analyzer
- Mini-Circuits 141-36SM+ 36" Male SMA to Male SMA cable rated up to 18 GHz
Software Setup
Starting with DW3_QM33_SDK_1.0.0, it is no longer possible to do continuous frame transmission using the default CLI application. This functionality is available through the default UCI application using UWB Qorvo Tools (UQT).
Therefore, we need to flash the board with the corresponding prebuilt UCI example from the SDK. This is found in SDK\Binaries. Refer to the respective Developer Manual found in SDK\Documentation\Developer Manual referring to section 4.4.2 Flashing the development kit.
Spectrum Analyzer Setup
Settings vary between different models of spectrum analyzers but the following are example recommended settings:
- RBW = VBW = 1 MHz
- Sweep Time = 2s
- Sweep Points = 2001
- Span = 2 GHz
- Center Frequency = 6.4896 GHz (Ch5) or 7.9872 GHz (Ch9)
- Trace Detector = Average
Steps
- Follow section 1.2 and 1.3 in
UWB-Qorvo-Tools-guide.pdffound inSDK\Tools\uwb-qorvo-toolsto setup environment for UQT. - Open a shell that you will use in the
uwb-qorvo-toolsfolder. - Activate the Python virtual environment (see section 1.3.2 for more details), e.g.,
.\.venv\Scripts\activate.ps1 - Set the default port corresponding to the serial port of the board you wish to use (see section 1.4.1 for more details), e.g.,
$env:UQT_PORT="COM140" - Load the calibration for the device (see section 2.2.10 for more details), e.g.,
load_cal.exe -f .\scripts\device\load_cal\calib_files\QM33120WDK1\jolie_omni_non_aoa.json - Run
run_fira_test_periodic_txto start the periodic transmission of UWB frames.- To transmit 1 frame per ms (with all other settings as default), use
run_fira_test_periodic_tx --t-gap 1000 - Use the
-hoption to view the help for the various options to configure the frame.
- To transmit 1 frame per ms (with all other settings as default), use
Tuning TX Power
After measuring the transmit power, you may wish to increase or decrease the transmit power.
- Read the current TX power setting using
get_cal, e.g., to display the tx_power_index in hex format for Channel 9 on ant0, useget_cal ant0.ch9.ref_frame0.tx_power_index -fx - Adjust the TX power using
set_cal, e.g., to set the tx_power_index to 0x20202020 for Channel 9 on ant0, useset_cal ant0.ch9.ref_frame0.tx_power_index 0x20202020 - Go back to step 6 to re-transmit frames.
Tuning Example
Here we have set up the spectrum analyzer as described above and look at the steps to measure the TX spectrum and reduce the TX power by 10dB.
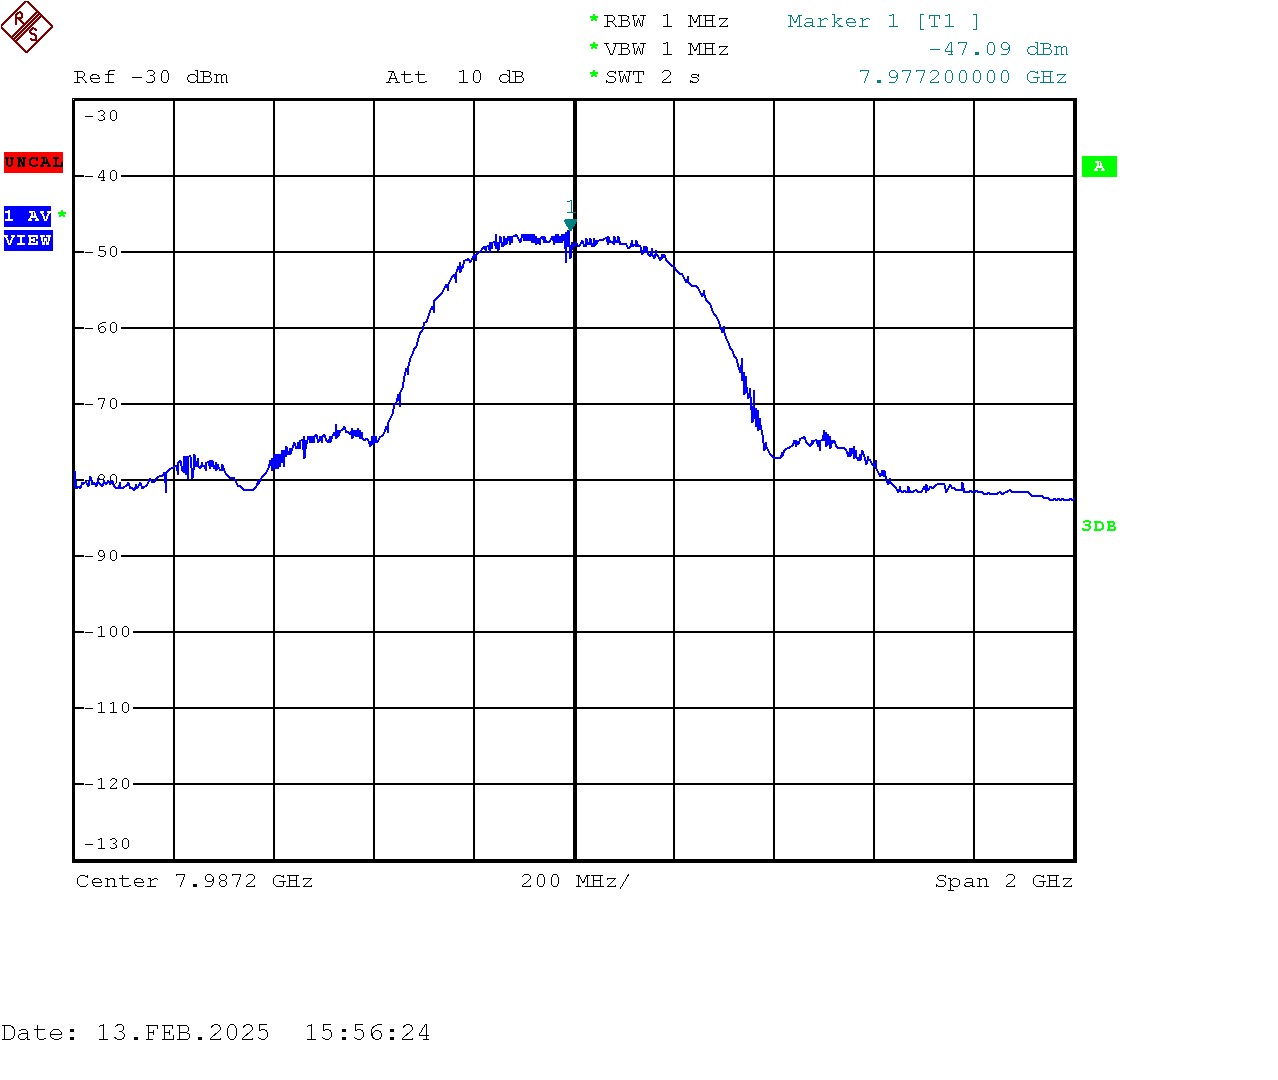
SDK 1.0.0 introduced tx_power_index which allows for the user to reduce the TX power in 0.25 dB steps each time the tx_power_index is incremented by 1 unit. Below, we read that the default tx_power_index is 0x0c0c0c0c. To reduce the TX power by 10dB, we need to increment the tx_power_index by 4*10 = 40 = 0x28. Therefore, the new tx_power_index would need to be 0x34343434 (0x0c + 0x28 = 0x34).
Steps to set up Python virtual environment, load calibration, and start transmitting 1 frame per ms:
PS C:\DW3_QM33_SDK_1.0.2\SDK\Tools\uwb-qorvo-tools> .\.venv\Scripts\Activate.ps1
(.venv) PS C:\DW3_QM33_SDK_1.0.2\SDK\Tools\uwb-qorvo-tools> $env:UQT_PORT="COM140"
(.venv) PS C:\DW3_QM33_SDK_1.0.2\SDK\Tools\uwb-qorvo-tools> load_cal.exe -f .\scripts\device\load_cal\calib_files\QM33120WDK1\jolie_omni_non_aoa.json

Setting provided calibration...
setting ant0.transceiver to value 0...Ok
setting ant0.port to value 1...Ok
setting ant0.lna to value 0...Ok
setting ant1.transceiver to value 1...Ok
setting ant1.port to value 1...Ok
setting ant1.lna to value 1...Ok
setting ant_pair0.axis to value 0...Ok
setting ant_set0.tx_ant_path to value 0...Ok
setting ant_set0.nb_rx_ants to value 1...Ok
setting ant_set0.rx_ants_are_pairs to value 0...Ok
setting ant_set0.rx_ants to value 1...Ok
setting ant_set0.tx_power_control to value 1...Ok
Calibration done.
(.venv) PS C:\DW3_QM33_SDK_1.0.2\SDK\Tools\uwb-qorvo-tools> run_fira_test_periodic_tx --t-gap 1000


 ----- TEST TEST_PERIODIC_TX_CMD -----
init TestSession 0 ...   Ok
Session 0 -> Init (StateChangeWithSessionManagementCommands)
Using Fira 2.0 session handle is : 0
TestConfigSet:           Ok
    ChannelNumber (0x4):                0x9
    DeviceMacAddress (0x6):             0x8d
    DstMacAddress (0x7):                [140]
    MacFcsType (0xb):                   0x0
    RframeConfig (0x12):                0x0
    PreambleCodeIndex (0x14):           0x9
    SfdId (0x15):                       0x2
    PsduDataRate (0x16):                0x0
    BprfPhrDataRate (0x31):             0x0
    PreambleDuration (0x17):            0x1
    PrfMode (0x1f):                     0x0
    NumberOfStsSegments (0x29):         0x0
    StsLength (0x35):                   0x1
    NumberOfControlees (0x5):           0x1
TestSetAppConfig:        Ok
Session 0 -> Idle (StateChangeWithSessionManagementCommands)
Device -> Active
Start periodic_tx test:  Ok
Session 0 -> Active (StateChangeWithSessionManagementCommands)
# PeriodicTxTestOutput gid:13, oid:2, Test Result:
        Status: Ok (0x0)

Session 0 -> Idle (StateChangeWithSessionManagementCommands)
Device -> Ready
Stop session:            Ok
session_deinit: Ok (0)
Session 0 -> DeInit (StateChangeWithSessionManagementCommands)
Ok
Resulting TX Spectrum with default tx_power_index
Steps to read tx_power_index setting and reduce it by 10dB:
(.venv) PS C:\DW3_QM33_SDK_1.0.2\SDK\Tools\uwb-qorvo-tools> get_cal ant0.ch9.ref_frame0.tx_power_index -fx
0c.0c.0c.0c
(.venv) PS C:\DW3_QM33_SDK_1.0.2\SDK\Tools\uwb-qorvo-tools> set_cal ant0.ch9.ref_frame0.tx_power_index 0x34343434
setting ant0.ch9.ref_frame0.tx_power_index = Uint32(875836468) = 875836468...
Ok (0)
(.venv) PS C:\DW3_QM33_SDK_1.0.2\SDK\Tools\uwb-qorvo-tools> get_cal ant0.ch9.ref_frame0.tx_power_index -fx
34.34.34.34
Step to transmit again:
(.venv) PS C:\DW3_QM33_SDK_1.0.2\SDK\Tools\uwb-qorvo-tools> run_fira_test_periodic_tx --t-gap 1000


 ----- TEST TEST_PERIODIC_TX_CMD -----
Session 0 -> Init (StateChangeWithSessionManagementCommands)
init TestSession 0 ...   Ok
Using Fira 2.0 session handle is : 0
TestConfigSet:           Ok
    ChannelNumber (0x4):                0x9
    DeviceMacAddress (0x6):             0x8d
    DstMacAddress (0x7):                [140]
    MacFcsType (0xb):                   0x0
    RframeConfig (0x12):                0x0
    PreambleCodeIndex (0x14):           0x9
    SfdId (0x15):                       0x2
    PsduDataRate (0x16):                0x0
    BprfPhrDataRate (0x31):             0x0
    PreambleDuration (0x17):            0x1
    PrfMode (0x1f):                     0x0
    NumberOfStsSegments (0x29):         0x0
    StsLength (0x35):                   0x1
    NumberOfControlees (0x5):           0x1
TestSetAppConfig:        Ok
Session 0 -> Idle (StateChangeWithSessionManagementCommands)
Device -> Active
Start periodic_tx test:  Ok
Session 0 -> Active (StateChangeWithSessionManagementCommands)
# PeriodicTxTestOutput gid:13, oid:2, Test Result:
        Status: Ok (0x0)

Session 0 -> Idle (StateChangeWithSessionManagementCommands)
Device -> Ready
Stop session:            Ok
Session 0 -> DeInit (StateChangeWithSessionManagementCommands)
session_deinit: Ok (0)
Ok
(.venv) PS C:\DW3_QM33_SDK_1.0.2\SDK\Tools\uwb-qorvo-tools>
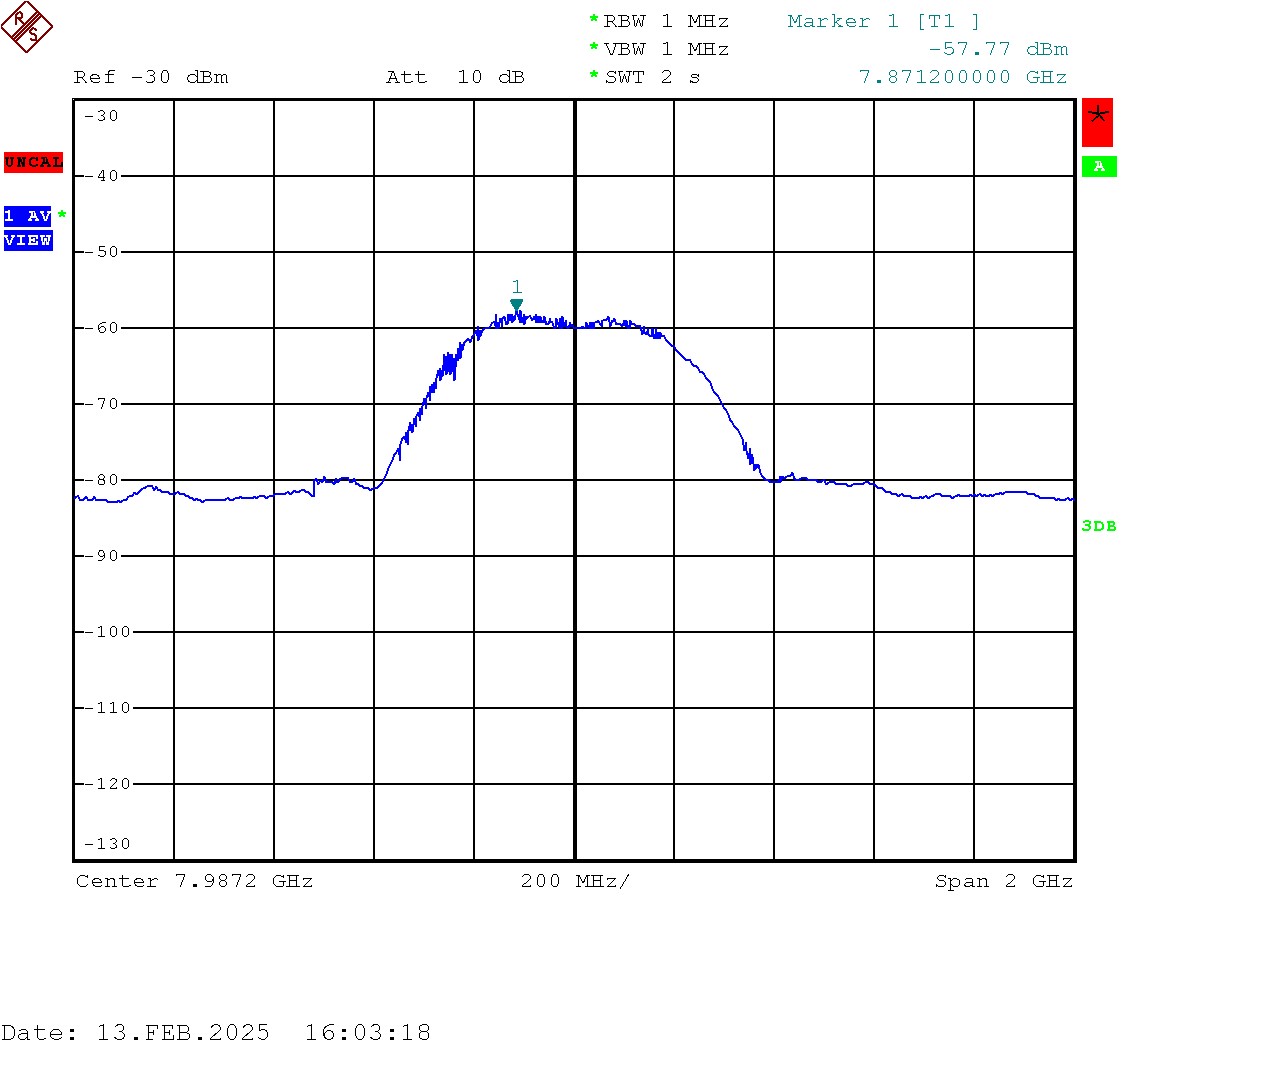
Resulting TX Spectrum with tx_power_index reduced by 10dB
Further Reading
There are many application notes published from Qorvo (and former DecaWave) regarding transmit power calibration. Please find those here. Though some application notes may refer to the older DW1000, much of the information is relevant for all UWB devices.
In particular, APS023 has good information on this topic.
Closing
If you have a question regarding the tutorial here or you find that there is an issue with the steps, please reply in this thread. We also welcome any suggestions for other tutorial topics for the DW3 QM33 SDK.
Otherwise, please open a new topic with your question and reference this tutorial if needed in your post.